 |
Publication Date: 16 February 1996
System Version: GCCS 2.1/Update 4
Web Page Created: 15 March 1996
| CREATE TPFDD FILE | ||
|---|---|---|
| 7 | <POINT AND CLICK (left)> on the MARINES toggle. | Toggle is depressed. |
| 8 | <POINT AND CLICK (left)> on Transmit. | Process initializes and the message line shows system processing. |
| 9 | When processing is finished, press <F11> or <POINT AND CLICK (left)> on F11-Menu. | The GCCS SYSTEM SERVICES menu (Similar to Fig. 2-4) redisplays. |
| OFFLOAD PLAN | ||
|---|---|---|
| Step | Activity | Anticipated Result |
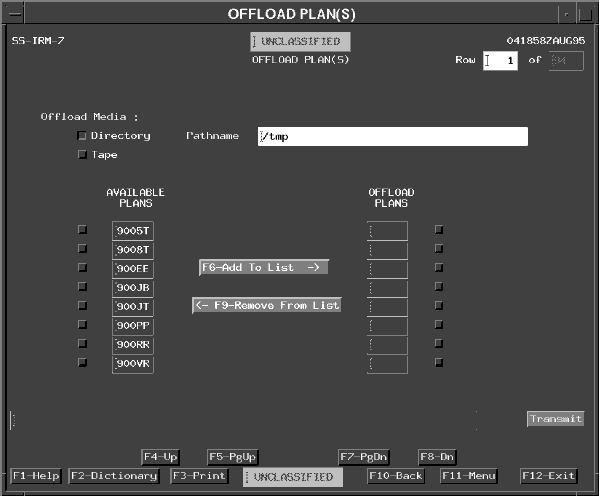
| 1 | From the Plan Management tear-off, <POINT AND CLICK (left)> on Offload Plan. | The OFFLOAD PLAN(S) window (Fig. 4-18) displays . |
 |
| OFFLOAD PLAN | ||
|---|---|---|
| 2 | Confirm the Directory toggle is depressed. | Toggle is depressed. |
| 3 | <POINT AND DOUBLE CLICK (left)> on the Pathname field and type the path to your user account directory "/h/USERS/{userid}/User_Storage"; insert your user account's USERID in place of the {USERID} variable. | Identifies the location on the server where this file will be stored. |
| OFFLOAD PLAN | ||
|---|---|---|
| 4 | Page as necessary and <POINT AND CLICK (left)> on the toggle for the
plan 9096M in the Available Plans list. |
Plan is marked. |
| 5 | <POINT AND CLICK (left)> on the F6-Add To List button. | Selected plan posts to the OFFLOAD PLANS column. |
If you made a mistake, you can remove a plan from the Offload Plans column by marking it and selecting the Remove From List toggle.
To execute the process, select the Transmit button.
| OFFLOAD OPLAN | ||
|---|---|---|
| 6 | <POINT AND CLICK (left)> on Transmit. | Confirmation pop-ups display. |
| 7 | <POINT AND CLICK (left)> on Yes for each pop-up to continue processing. | The OFFLOAD PLAN(S) window (Fig. 4-18) redisplays. |
| 8 | After you see "OFFLOAD PROCESSING COMPLETED" in the message line, press <F10> or <POINT AND CLICK (left)> on the F10-Back button to return to the previous window. | The previous window displays. |
This option will initialize an OPLAN shell in the database to receive the records.
You will load the Marine TPFDD file you created into a 909XS OPLAN shell.
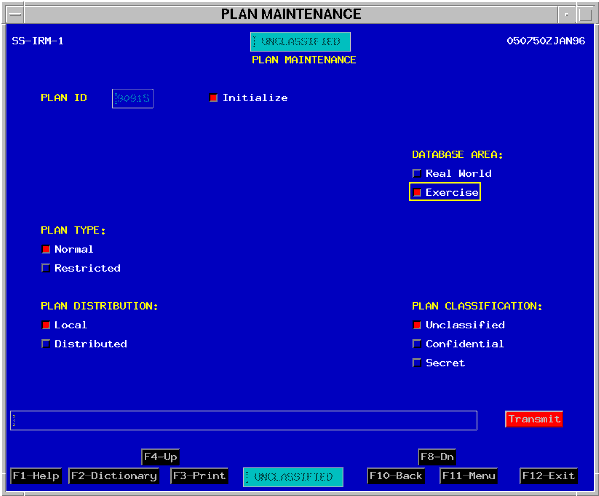
Requirement. Use the Load Plan from TPFDD option to load the Marine records extracted from 900XT into a new OPLAN (909XS). Initialize 909XS as an exercise, normal, local, and unclassified OPLAN.
| LOAD PLAN FROM TPFDD | ||
|---|---|---|
| Step | Activity | Anticipated Result |
| 1 | From the Plan Management tear-off, <POINT AND CLICK (left)> on Load Plan from TPFDD. | The LOAD PLAN FROM TPFDD window (Fig. 4-19) displays. |
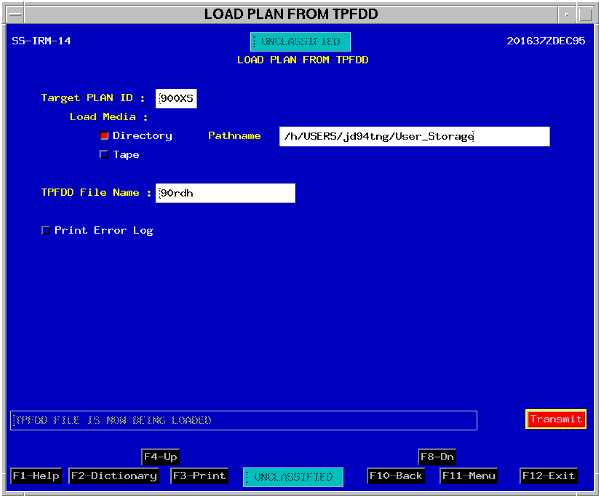
The process takes place in the background so all you need to do is monitor the window until it is done.
| LOAD PLAN FROM TPFDD | ||
|---|---|---|
| 2 | In the Target Plan ID field, type "909xs". | Plan ID posts. |
| 3 | Confirm the Directory toggle is depressed. | Toggle is depressed. |
| 4 | <POINT AND DOUBLE CLICK (left)> on the Pathname field and type "/h/USERS/{userid}/User_Storage". | Path information posts. |
| 5 | <POINT AND CLICK (left)> in the TPFDD File Name field, type "900xt_marines". | File information posts. |
| 6 | <POINT AND CLICK (left)> on Transmit. | Process initializes and the message line shows system processing. Then the PLAN MAINTENANCE initialize window (Fig. 4-20) displays. |
| LOAD PLAN FROM TPFDD | ||
|---|---|---|
| 7 | <POINT AND CLICK (left)> on the Exercise toggle. | Toggle is depressed. |
| 8 | <POINT AND CLICK (left)> on Transmit. | Perform Reload of Indicated OPLAN? pop-up window displays. |
| 9 | <POINT AND CLICK (left)> on Yes. | The LOAD TPFDD window (Fig. 4-19) redisplays in the background.
XTP MESSAGES window displays in the foreground. |
| 10 | When processing is complete, <POINT AND DOUBLE CLICK (left)> on the
Window Menu button  in top left corner of the XTP MESSAGES window to close it. in top left corner of the XTP MESSAGES window to close it. |
XTP MESSAGES window closes and the LOAD TPFDD window (Fig. 4-19) redisplays. |
| 11 | From the LOAD PLAN FROM TPFDD window, press <F10> or <POINT AND CLICK (left)> on the F10-Back button to return to the previous window. | The previous window displays. |
Note: The next lesson will demonstrate this option.
OBJECTIVE. Given JOPES operating in a GCCS environment, save an OPLAN to a tape and to a file.
Primarily, two types of tapes (or cassettes) are used: 8mm or 4mm.
4mm tapes are about half the size of an 8mm tape and can hold 2 GB of data.
Note: Like diskettes, tapes also have a read only or read/write tab. It is usually well marked on the tape.
| OFFLOAD PLAN TO TAPE | ||
|---|---|---|
| Step | Activity | Anticipated Result |
| 1 | Load the appropriate tape into the tape drive. | Tape drive closes and you may hear the tape drive "whine" as it loads the tape. |
| 2 | From the Plan Management tear-off, <POINT AND CLICK (left)> on Offload Plan. | The OFFLOAD PLAN(S) window (Fig. 4-18) redisplays. |
| OFFLOAD PLAN TO TAPE | ||
|---|---|---|
| 3 | <POINT AND CLICK (left)> on the Tape toggle. | Toggle is depressed and activated. |
| 4 | Confirm that the Pathname field shows /dev/rmt/0. | Identifies the location on the server where this file will be stored. |
| OFFLOAD PLAN TO TAPE | ||
|---|---|---|
| 5 | Page as necessary and <POINT AND CLICK (left)> on the
toggle for the plan 9096M in the Available Plans list. |
Plan is marked. |
| 6 | <POINT AND CLICK (left)> on the F6-Add To List button. | Selected plan posts to the OFFLOAD PLANS column. |
If you made a mistake, you can remove a plan from the Offload Plans column by marking it and selecting the Remove From List toggle.
To execute the process, select the Transmit button.
| OFFLOAD OPLAN | ||
|---|---|---|
| 7 | <POINT AND CLICK (left)> on Transmit. | Confirmation pop-ups display. |
| 8 | <POINT AND CLICK (left)> on Yes for each pop-up to continue processing. | The OFFLOAD PLAN(S) window (Fig. 4-18) redisplays. |
| 9 | After you see "OFFLOAD PROCESSING COMPLETED" in the message line, press <F10> or <POINT AND CLICK (left)> on the F10-Back button to return to the previous window. | The previous window displays. |
You now know about moving OPLANs and TPFDDs into and out of the JOPES database. To make sure you are comfortable with this process, please complete the practical exercise below.
| PRACTICAL EXERCISE - CREATE A TPFDD FILE | ||
|---|---|---|
| Step | Problem | Solution |
| 4.1 | Create a TPFDD file containing only Army records from 900XT and save them in a file located in your personal storage area. | |
| 4.2 | After the instructor verifies your efforts to create a TPFDD file, please exit System Services. | |
OBJECTIVE. Given a GCCS environment, manage your personal JOPES OPLAN and TPFDD files.
To use the graphic, start with the applicable program and you can determine a file transfer path to or from the application program. FTPtool, IMS, and RFM can transfer files from sources to destinations/applications. It also shows that floppy disks can be used to copy some reference files into JFAST.
IMS Admin Tool. The IMS Admin Tool, which is a separate icon in the Session Manager Launch Window, controls the file sources and destinations that appear on the IMS window.
Since IMS only transfers TPFDD related data, you also need another tool to transfer non-TPFDD data to applications like JFAST or DART.
System Format Conversion. FTPtool can accommodate most system conversion requirements, but there are exceptions caused by the multitude of data formats, character standards, and other file parameters that vary between computers and operating systems.
FTPtool only makes system conversions; it does not change files to specific formats required by some of the applications. For example, TPFDD format conversions are handled by the Information Management System.
OBJECTIVE. Given a GCCS environment, manipulate TPFDD files using IMS to provide TPFDD file access for other JOPES applications.
Requirement. Export 909XS from the GCCS JOPES DB (database), import it to the External destination file, then delete the 909XS file from IMS. Later in the lesson you will transfer a 909XS TPFDD from the External destination UNIX directory (/h/data/local/tpfdd) to your User_Storage account (/h/USERS/{USERID}/Scripts/User_Storage).
Note: The System Services' Create TPFDD option can also export a TPFDD from the database; however, only the USERID that exports the file can read/transfer the file. In order for other users to access a file exported from the database, it must be exported via the IMS process to the External destination file.
| IMS NAVIGATION | ||
|---|---|---|
| Step | Activity | Anticipated Result |
| 1 | From the Launch Window, <POINT AND DOUBLE CLICK (left)> on the IMS icon. | The TIP INFORMATION MANAGMENT SYSTEM - VERSION 3.3 window (Fig. 4-21) displays. |
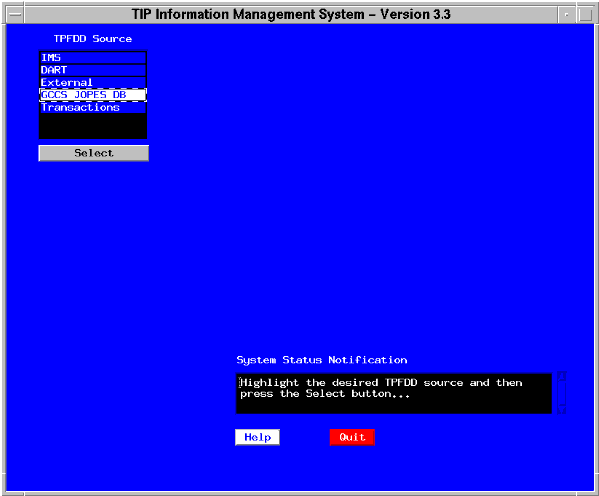
After something has been imported to IMS, it can be a source when sending TPFDDs to other applications.
The External file is a source for data transferred to the server using manual programs like FTPtool or UNIX "copy" or "move" commands.
Note: The External source file contains files stored in an ASCII text file format for IMS access. The server's UNIX directory for the External source/destination file (when transferring information to or from the server) is "/h/data/local/tpfdd".
System Status Notification Panel. The System Status Notification panel tells you what to do and keeps you apprised of what the system is doing behind the scenes.
| IMS NAVIGATION | ||
|---|---|---|
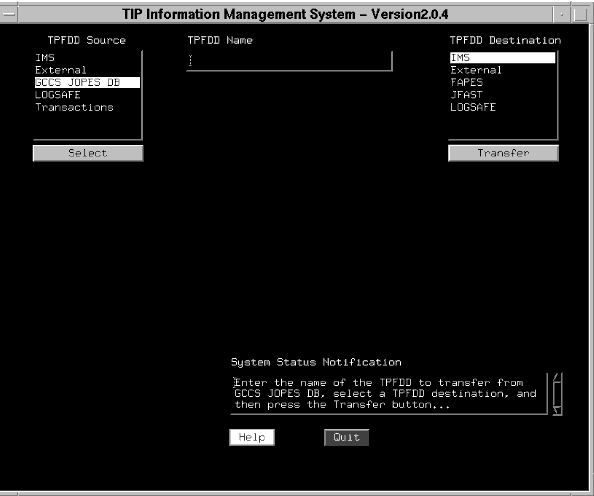
| 2 | <POINT AND CLICK (left)> on GCCS JOPES DB in the TPFDD Source panel. | GCCS JOPES DB highlights. |
| 3 | <POINT AND CLICK (left)> on the Select button. | Additional panels (Fig. 4-22) post to the IMS window. |
 |
| IMS NAVIGATION | ||
|---|---|---|
| 4 | <POINT AND CLICK (left)> on TPFDD Name field, type "909xs". | Cursor moves to the TPFDD Destination panel. |
IMS converts the information to the correct format for each destination application.
The destination, titled External, stores data to the /h/data/local/tpfdd disk directory for manual transfers to other computers that cannot be completed using the IMS process. Just like before, the information is stored in an ASCII text file format.
The selected destination is outlined or highlighted.
Transfer Button. Pressing the Transfer button under the Destination panel starts the process to export a TPFDD from the designated source and imports it to a designated destination.
| IMS NAVIGATION | ||
|---|---|---|
| 5 | <POINT AND CLICK (left)> on External in the Destination panel. | External highlights. |
| 6 | <POINT AND CLICK (left)> on the Transfer button. | The DATA LIMITATION SELECTION window (Fig. 4-16) redisplays to select records from the database. |
| 7 | Confirm that 909XS is in the plan field. | TPFDD number posts. |
| 8 | <POINT AND CLICK (left)> on the None (No limitations) toggle to select
all records.
<POINT AND CLICK (left)> on Transmit. |
Plan transfers from the JOPES database to IMS storage and the message line gives the number of records generated. |
| 9 | Press <F10> or <POINT AND CLICK (left)> on the F10- Back button to return to the previous window. | Processing window displays to transfer the 909XS file from IMS to the External destination file. |
| 10 | As required, press <ENTER> to continue the process. | IMS window displays TPFDD information. |
Note: The IMS file format includes all the Comments, IMS Information, and Operating System (O.S.) File Information that is not available in the ASCII text file format.
Once a TPFDD is stored in IMS, you can rename it, delete it, or import copies of it to other applications.
When you select IMS as a TPFDD source, IMS generates additional information panels to help you manage the export/import process.
| IMS NAVIGATION | ||
|---|---|---|
| 11 | <POINT AND CLICK (left)> on IMS in the TPFDD Source
panel.
<POINT AND CLICK (left)> on Select. |
IMS window (Fig. 4-23) displays. |
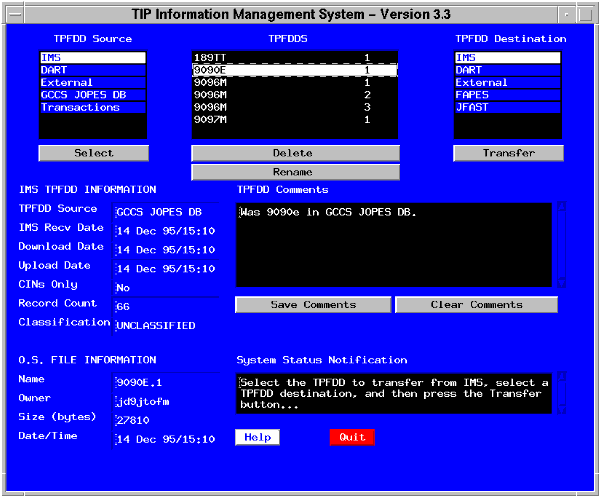
Note: IMS users with IMS export permissions have access to all the TPFDDs. TPFDDs in IMS are not controlled by the OPLAN number series access permissions designated in the System Services application.
Rename Button. Renaming a TPFDD with the Rename button does not change the real OPLAN number of the TPFDD or the UNIX file name on the server. If you import it to another application, the new name gets transferred along with the old OPLAN number. The TPFDD Name is only an IMS naming tool.
Note: WARNING. Renaming a TPFDD does not change the UNIX filename. If you transfer a TPFDD to IMS that has the same name as the original name of a renamed TPFDD, the newly transferred TPFDD will overwrite the renamed one. Both TPFDD names will show in IMS, but they both point to the same file (filename); the file for the renamed TPFDD is overwritten.
The naming convention helps you differentiate one TPFDD from another.
To view the specific information regarding your TPFDD, you must select it on the TPFDDs panel.
| IMS NAVIGATION | ||
|---|---|---|
| 12 | <POINT AND CLICK (left)> on your TPFDD (909XS) to make it the active record. | TPFDD 909XS is highlighted. |
O. S. File Information. The O.S. File Information section contains the UNIX file information. The Owner is the USERID of the person who created the UNIX file.
TPFDD Comments Panel. The TPFDD Comments panel is one of the most important areas of the window because it can provide a wealth of management information about the TPFDD highlighted in the TPFDDS panel.
IMS automatically enters a minimum amount of information concerning the PID and its origin. The planner who transfers a TPFDD into IMS should activate the panel and type comments. Up to 4000+ characters can be used (about 800 words).
Clear Comments Button. To start with an empty panel, you can select the Clear Comments button.
IMS Status & Error Messages. During the IMS process you will see numerous status messages and, hopefully, no error messages. The messages are very descriptive and should tell you what to do to finish the process.
To remedy some situations, you may have to restart IMS.
You have completed the IMS section of this lesson so please quit IMS.
| QUIT IMS | ||
|---|---|---|
| Step | Activity | Anticipated Result |
| 1 | <POINT AND CLICK (left)> on the Quit button. | You exit IMS and return to the last active Window. |
OBJECTIVE. Given a JOPES environment, use the FTPtool software to copy a file from one host to another host computer.
UNIX Write permissions allow you to write and delete files.
View/Delete Files. If you can see a file name in your user account via the FTPtool window, you will probably be able to view and/or delete the contents of the file. If you are reviewing files outside your user account, you can only view the ones to which you have read permissions.
Copy Files. You can also use FTPtool to copy file(s) from one directory to another directory.
The host you originally logged into is called the local host and the host you connect to is called the remote host.
You must have a user account at both the local and remote host.
This function allows you to copy files from other user accounts into your account.
You will use FTPtool to copy a TPFDD from the IMS External destination directory (/h/data/local/tpfdd) into your user account.
Requirement. Using the FTPtool, login to a remote host from your local host, copy a TPFDD to your user account, and view it.
| FTPtool | ||
|---|---|---|
| Step | Activity | Anticipated Result |
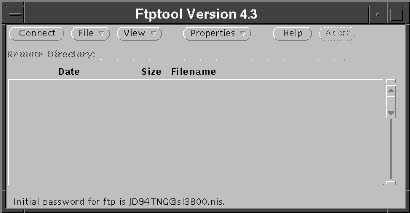
| 1 | From the LAUNCH WINDOW, <POINT AND DOUBLE CLICK (left)> on the FTPtool icon. | Ftptool Version 4.3 window (Fig. 4-24) displays. |
| FTPtool | ||
|---|---|---|
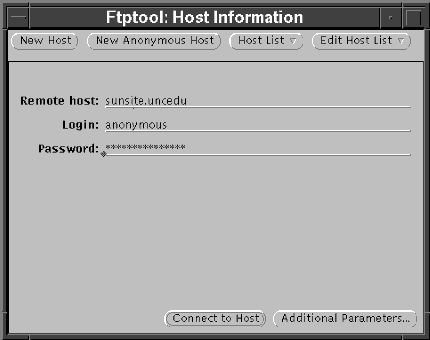
| 2 | <POINT AND CLICK (left)> on the Connect button. | Ftptool: Host Information window (Fig. 4-25) displays. |
| FTPtool | ||
|---|---|---|
| 3 | <POINT AND CLICK (left)> on the New Host button to clear the login entry lines. | Remote host, Login, and Password lines clear. |
| 4 | Type the {server name} of the site's server and press <ENTER>. | Server name posts to line. |
| 5 | Type your login {userid} and press <ENTER>. | USERID posts to line. |
| 6 | Type your login {password}. | ******* symbols hide password entry. |
| 7 | <POINT AND CLICK (left)> on the Additional Parameters ... button. | Ftptool: Host Information window expands (Fig. 4-26). |
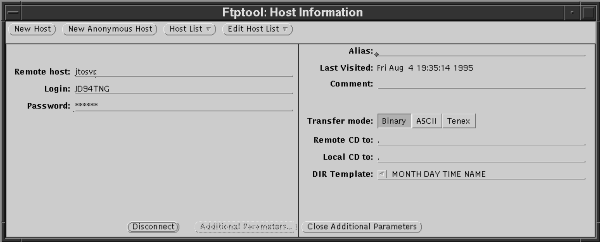
 ) on the line represents a UNIX
code for the "current directory" specified for the login user account. Unless you know the exact directory
name of the file you are looking for, the current directory is a good place to start.
Note: Directory names and file names are case sensitive in UNIX.
 ) represents your current directory. You can enter directory path information here
or change it later during the transfer process.
Note: The current directory for a normal GCCS user account, represented in UNIX commands
by a dot ( ), is /h/USERS/{USERID}/Scripts where {USERID} is a user defined variable.
This lesson uses the /h/USERS/{USERID}/Scripts/User_Storage directory as a common storage area for all FTPtool and System Services processing. Thus, the User_Storage directory is the common directory for user account activity because the Session Manager applications, under the Tools option, also import and export files to the User_Storage directory by default.
| FTPtool | ||
|---|---|---|
| 8 | <POINT AND CLICK (left)> on the dot (  ) in the
Local CD to: line. ) in the
Local CD to: line. |
|
| 9 | Type "/User_Storage". | Directory string posts to entry line. |
| 10 | <POINT AND CLICK (left)> on the dot (  ) in the Remote CD
to: line. ) in the Remote CD
to: line. |
|
| 11 | Type "/User_Storage". | Directory string posts to entry line. |
| 12 | <POINT AND CLICK (left)> on the Connect to Host button. | Ftptool Version 4.3 - {Remote Host} window (Fig. 4-27) displays. |
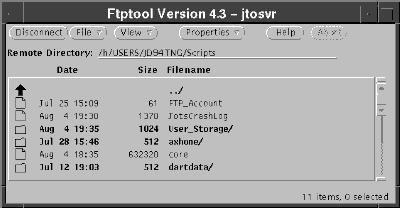
Local Directory List. You can also display your local directory list at the same time. Reading the window titles will help you identify a remote directory list from a local directory list.
| FTPtool | ||
|---|---|---|
| 13 | <POINT AND CLICK (right)> on the View button. | FTPtool View pulldown menu (Fig. 4-28) displays. |
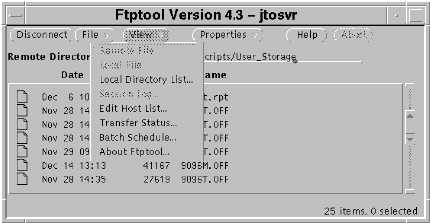
| FTPtool | ||
|---|---|---|
| 14 | <POINT AND CLICK (left)> on the Local Directory List ... option. | Ftptool: Local Host -... displays (similar to Figure 4-27). |
To move to a higher directory level, you <POINT AND DOUBLE CLICK (left)> on the bold up arrow to remove the directory from the Remote Directory line.
You will now move to the /h/data/local/tpfdd directory on the remote host. Then you can access the plan put there by another student and copy that plan from the remote host to the local host directory. The local host directory is the directory you specified earlier (Local CD to:) when you connected to the remote host.
Since the OPLAN (9096M) was offloaded to your User_Storage directory earlier, you should store the other student's TPFDD there also. That way they will be grouped in the same location and you can manage them together.
Note: OPLAN files offloaded by System Services (Offload Plan) are identified with a .OFF suffix (xxxxx.OFF). TPFDD files created by System Services (Create TPFDD) reflect the file name specified. IMS TPFDDs exported from the JOPES DB are identified by the TPFDD name without the .OFF suffix.
| FTPtool | ||
|---|---|---|
| 15 | From the Ftptool Version 4.3 - {Remote Host} window, <POINT AND DOUBLE CLICK (left)> on the up arrow symbol until the Remote Directory line reads "/h". | Root directories and files appear in the display panel. |
| 16 | <POINT, CLICK, DRAG, AND RELEASE> the scroll button to a location where data/ appears in the display panel. | "data/" displays in the panel. |
| 17 | <POINT AND DOUBLE CLICK (left)> on data/. | "/h/data" posts to the Remote Directory line and the directory information posts to the panel. |
| 18 | <POINT, CLICK, DRAG, AND RELEASE> the scroll button to a location where local/ appears in the display panel. | "local/" displays in the panel. |
| 19 | <POINT AND DOUBLE CLICK (left)> on local/. | "/h/data/local" posts to the Remote Directory line and the directory information posts to the panel. |
| 20 | <POINT, CLICK, DRAG, AND RELEASE> the scroll button to a location where tpfdd/ appears in the display panel. | "tpfdd/" displays in the panel. |
| 21 | <POINT AND DOUBLE CLICK (left)> on tpfdd/. | "/h/data/local/tpfdd" posts to the Remote Directory line and the directory information posts to the panel. |
| 22 | Scroll as necessary and <POINT AND CLICK (left)> on another student's TPFDD file name. | TPFDD name is selected. |
The File button and other buttons with arrowheads on them are selected by the right mouse button.
If you <POINT AND CLICK (left)> on an arrowhead button, the first activity in the button's pull-down menu is selected by default.
| FTPtool | ||
|---|---|---|
| 23 | <POINT AND CLICK (right)> on File. | Pull-down menu displays File options. |
| 24 | <POINT AND CLICK (right)> on Copy. | Copy cascade displays. |
| 25 | <POINT AND CLICK (left)> on Remote to Local. | "Receive of ..." message displays at bottom of window and Ftptool:Local Host Directory List is updated. |
| FTPtool | ||
|---|---|---|
| 26 | From the Ftptool:Local Host window, scroll as necessary and <POINT AND DOUBLE CLICK (left)> on the other student's TPFDD file name that you copied from the /h/data/local/tpfdd directory. | Text Editor V3.3 -... window (Fig. 4-29) displays file contents. |
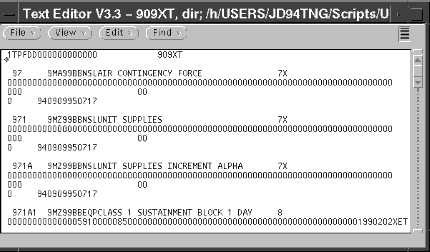 |
After you see the text, you can exit the Text Editor, return to your local host directory, and delete the other student's 909XS TPFDD from your User_Storage directory.
| FTPtool | ||
|---|---|---|
| 27 | From Ftptool: Local Host window, <POINT AND DOUBLE
CLICK (left)> on Text Editor V3.3 - {OPLAN} Window Menu button  to close the window. to close the window. |
Ftptool: Local Host -... displays (similar to Figure 4-27). |
| 28 | Scroll as necessary and <POINT AND CLICK (left)> on the TPFDD file you transferred from the /h/data/local/tpfdd directory. | Plans are highlighted. Note: Besides recognition of the TPFDD file name, you can identify the most recently copied file by using the date/time stamp. |
| 29 | <POINT AND CLICK (right)> on File. | Pull-down menu displays File options. |
| 30 | <POINT AND CLICK (right)> on Delete. | Local File option displays. |
| 31 | <POINT AND CLICK (left)> on Local File. | Pop-up requests confirmation to delete the file. |
| 32 | <POINT AND CLICK (left)> on Delete. | File is removed from the local host's directory. |
| FTPTOOL: CHECKING FILE PROPERTIES | ||
|---|---|---|
| Step | Activity | Anticipated Result |
| 1 | <POINT AND CLICK (left)> on any file of your choice in the Remote Directory List. | File is highlighted. |
| 2 | <POINT AND CLICK (right)> on Properties. | Properties pulldown menu (Fig. 4-30) displays. |
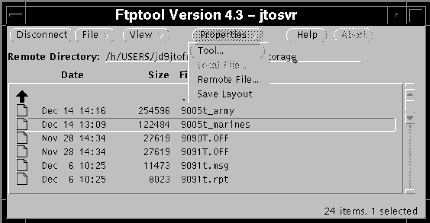
| FTPTOOL: CHECKING FILE PROPERTIES | ||
|---|---|---|
| 3 | <POINT AND CLICK (left)> on Remote File. | Ftptool: Remote File Properties window (Fig. 4-31) displays. |
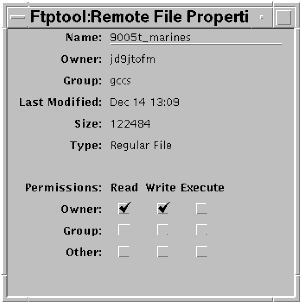
This window will allow you to appear to modify the permissions associated with the file; however, the file permissions are not really modified. If you were to refresh the window, the original permissions would display.
Note: Modification of permissions associated with files will be discussed later in the lesson.
| FTPTOOL: EXIT | ||
|---|---|---|
| Step | Activity | Anticipated Result |
| 1 | From the Ftptool Version 4.3 - {Remote Host} window, <POINT AND CLICK (left)> on Disconnect. | Directory/File display is cleared. |
| 2 | <POINT AND DOUBLE CLICK (left)> on the Ftptool Version 4.3 - {Remote
Host} window Menu Button  |
LAUNCH WINDOW (Fig. 2-1) redisplays. |
Note: Available compression/decompression tools: FTPtool programs are in the File option. The WWS can use a program called StuffIt. The DOS based computers can use a program called PKZIP that comes packaged in the JFAST \Utils directory. SPARCstations can use either compress/uncompress or pack/unpack. There are UNIX manual pages available for compress and pack that describe how to use these commands.
Note: To export (save) a file(s) to a DOS disk from a WWS, you can first use the FTPtool to access the server where the file resides. Then use FTPtool to copy the file(s) from the remote machine to your client machine. From a WWS, you then use the "doscp <filename> -d /dev/rfloppy0" (DOS copy) command to copy the file to a DOS formatted disk. If you have access to a command line on a SPARCstation, you can use a program called "filemgr" located in the /usr/openwin/bin directory. "filemgr" operates somewhat like Microsoft Windows. If you need help, see a System Administrator for assistance when using the UNIX commands.
Requirement. Save the 900XT_marines file in your User_Storage directory to floppy disk (DOS format).
| SAVE FILE TO FLOPPY DISK | ||
|---|---|---|
| Step | Activity | Anticipated Result |
| 1 | From a JFAST computer, type the Tigersafe {password} and press <ENTER>. | Enter User ID prompt displays. |
| 2 | If required, type your Tigersafe {userid}. | DOS prompt displays. |
| SAVE FILE TO FLOPPY DISK | ||
|---|---|---|
| 3 | Insert a DOS formatted floppy disk into the drive slot. | |
| 4 | At the DOS prompt, type {drive letter}: for the floppy drive and press
<ENTER>.
The {drive letter}: specifies the drive where the file will be saved. |
Floppy drive becomes the active drive |
| 5 | At the new DOS prompt, type "ftp {server name}" and press <ENTER> to open the data link between the local host and the server. | Login Name prompt displays. |
| 6 | Type your GCCS {USERID} and press <ENTER>. | Password prompt displays. |
| 7 | Type your GCCS {password} and press <ENTER>. | Link is opened to the server and the ftp> prompt displays. |
| 8 | Type "cd User_Storage" and press <ENTER> to change to the server directory where the 900XT_marines file is stored. | /h/USERS/{USERID}/Scripts/User_Storage becomes the working directory. |
| 9 | Type "get 900xt_marines" and press <ENTER> to transfer the file to the floppy drive. | Screen advisories display during file processing and ftp> prompt redisplays. |
| 10 | Type "quit" and press <ENTER>. | Floppy drive prompt redisplays. |
| 11 | Type "dir" and press <ENTER> to review the file transferred to the floppy disk. | File name stored on floppy disk displays. The name is truncated to eight characters. |
| 12 | Type "lock" to activate the Tigersafe program. | Tigersafe screen displays. |
| 13 | Remove floppy disk and ensure it is marked with contents and classification of the file. | |
While the Session Manager cannot save a System Services and/or FTPtool created file to floppy disk, the Session Manager can import files from floppy disk for System Services and/or FTPtool access.
Requirement. Import a file from the instructor provided floppy. This file contains Air Force TPFDD records in transaction format that will be used in the next lesson to update the JOPES database.
| SESSION MANAGER FOLDER | ||
|---|---|---|
| Step | Activity | Anticipated Result |
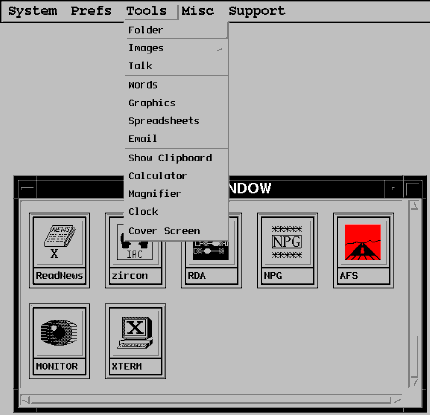
| 1 | From the Session Manager Menu Bar, <POINT AND CLICK (left)> on Tools. | Tools pulldown menu (Fig. 4-32) displays. |
 |
| SESSION MANAGER FOLDER | ||
|---|---|---|
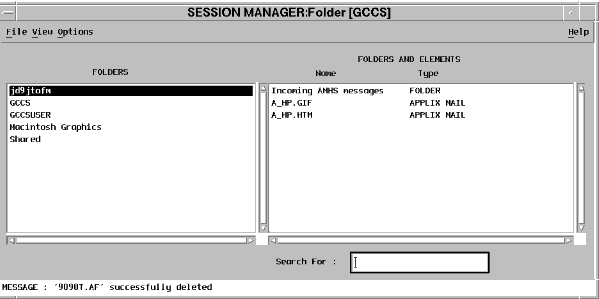
| 2 | <POINT AND CLICK (left)> on Folder. | SESSION MANAGER: Folder window (Fig. 4-33) displays. |
 |
| SESSION MANAGER FOLDER | ||
|---|---|---|
| 3 | <POINT AND CLICK (left)> on your {userid} folder | Folder is highlighted |
| 4 | <POINT AND CLICK (left)> on Options. | Options pulldown menu (Fig. 4-34) displays. |
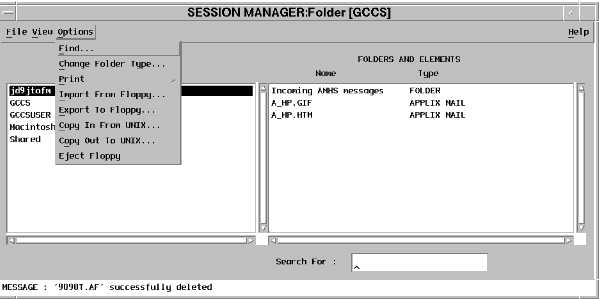 |
| SESSION MANAGER FOLDER | ||
|---|---|---|
| 5 | <POINT AND CLICK (left)> on Import From Floppy... . | SESSION MANAGER: Import window (Fig. 4-35) displays. |
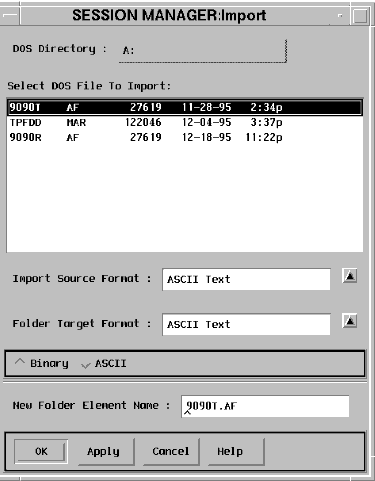 |
| SESSION MANAGER FOLDER | ||
|---|---|---|
| 6 | <POINT AND CLICK (left)> on the 909XT.AF line. | The 909XT.AF line highlights. Note: You can only highlight one file at a time, i.e., no multiple file copying is allowed. |
| 7 | <POINT AND CLICK (left)> on OK. | Import window disappears. The message line on the SESSION MANAGER: Folder window contains messages that follow the progress of the import. |
| 8 | <POINT AND CLICK (left)> on Options. | The Options pulldown (Fig. 4-34) redisplays. |
| 9 | <POINT AND CLICK (left)> on Eject Floppy. | The floppy disk ejects. |
You can also access the file in the User_Storage directory via the FTPtool functions demonstrated earlier.
But there is a catch! The SESSION MANAGER: Folder system attaches additional information onto the filename. For example, the SESSION MANAGER: Folder may show you a file named 909XT.AF, but it's true filename, to all other applications, is 909XT.AF_353950002.AF.
So, if you give another application, like System Services, the SESSION MANAGER: Folder filename, the other application will not find the file.
One possible work around is to remove the offending appendage! Later in this lesson you will use a UNIX command to rename the files. For now, remember that with SESSION MANAGER: Folder, all is not always as it seems!
| SESSION MANAGER FOLDER | ||
|---|---|---|
| 10 | From the SESSION MANAGER: Folder Menu Bar, <POINT AND CLICK (left)> on File. | File pulldown menu (Fig. 4-36) displays. |
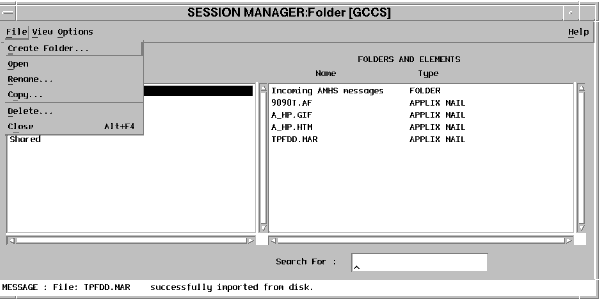 |
| SESSION MANAGER FOLDER | ||
|---|---|---|
| 11 | <POINT AND CLICK (left)> on Close. | SESSION MANAGER: Folder window closes. |
The focus of the lesson moves from OPLAN/TPFDD transfers to reference file administration.
OBJECTIVE. Given a GCCS environment, manipulate the reference files using RFM to provide access to other JOPES applications.
Even though these data stores are fairly static, they do change. Services and agencies submit changes to these data stores in accordance with the Joint Reporting Structure (JRS) established for each Reference File. The RFA software is available only on the NMCC application server, and is only executed by DISA/JIEO/JEXNCP personnel.
Once JRS transactions have been verified and processed by RFA, JEXNCP personnel update the Reference Files stored on the JOPES Core database (JCDB), present on all JOPES database severs within GCCS.
RFM Capability. Some JOPES applications cannot directly access the JOPES database, but they still need the JOPES reference files. For these applications, the reference file data is transferred using a program called Reference File Manager (RFM).
Reference Manager Admin Tool. RFM also has an Admin Tool just like IMS. The Admin Tool for the Reference File Manager specifies the file names that may be selected for transfer into the application programs.
Other Sources of Reference Data. Not all reference information is available from the JOPES database through the RFM. For those cases where the data comes from sources external to the GCCS network, manual procedures must be used to transfer the information.
FAPES Reference Files. The data to support FAPES exists in Joint, OSD, and non-Defense Department mobilization systems. Some of the reference data is exported from the JOPES database and some comes on tape. Contact the DISA GCCS hotline at DSN 653-8681 if you need additional details.
Now that you know when to use the file transfer tools, the lesson describes and demonstrates how to do it.
The lesson now demonstrates how to use the Reference File Manager to copy reference files from the server to applications on the server or other host computers.
| RFM NAVIGATION | ||
|---|---|---|
| Step | Activity | Anticipated Result |
| 1 | <POINT AND DOUBLE CLICK (left)> on the Reference Manager icon. | RFM window displays (similar to Fig. 4-37). |
| 2 | Scroll as necessary and <POINT AND CLICK (left)> on GEO to activate the display. | The application name and last transfer date (Fig. 4-37) display. |
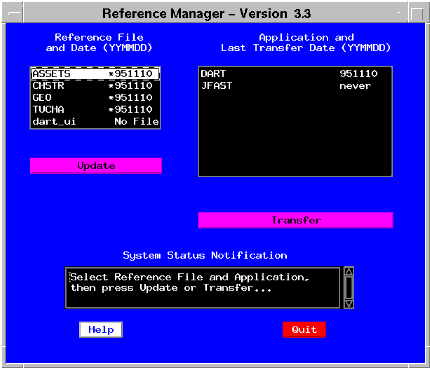
Unlike IMS where all options are selected and then the entire transfer process occurs, the RFM process is sequential; you update the data first, then you transfer it.
The date entry column in the panel shows several types of information.
A year/month/day entry shows the date stamp of the reference file itself.
If a file does not have a date stamp, RFM adds an asterisk and records the date the file was loaded onto the RFM server.
Update Button. The Update button starts the requested update from the JOPES database to the RFM server.
Application and Last Transfer Date Panel. The applications that can receive the reference files are listed in the Application and Last Transfer Date panel.
The date shows the last date the file was transferred into the application. This is very useful information because you can compare this date with the date stamp on the file to see if the application is using the latest file available on the server.
Transfer Button. The Transfer button causes the actual transfer of the file to the selected application.
System Status Notification Panel. The system gives you immediate feedback concerning RFM system progress by displaying messages in the System Status Notification panel.
Note: Unless someone has updated the RFM server's reference files, the RFM window probably reflects the first set of reference files that were installed with the GCCS environment.
| RFM NAVIGATION | ||
|---|---|---|
| 3 | <POINT AND DOUBLE CLICK (left)> on Quit. | RFM window is closed. |
OBJECTIVE. Given an operational GCCS environment with access to an X-Term Icon, demonstrate the use of basic UNIX commands in support of JOPES operations.
You will use commands that deal with file structure, permissions, devices, network commands, and commands to monitor a program. But first you need to open an X-Term window where you will enter these commands.
| START XTERM WINDOW | ||
|---|---|---|
| Step | Activity | Anticipated Result |
| 1 | From the LAUNCH WINDOW, <POINT AND DOUBLE CLICK (left)> on the X-TERM icon. | X-Term window displays. |
| pwd | ||
|---|---|---|
| Step | Activity | Anticipated Result |
| 1 | From the UNIX prompt, type "pwd" and press <ENTER>. | The current working directory is displayed. |
Your home directory is the default location for files you create.
"cd". The "cd" (change directory) command, followed by a directory name, enables you to change the working directory to another directory.
"cd /" backs all the way up to the root directory.
"cd" by itself returns you to your home directory.
The lesson will now use variations of the "cd" command to move up and down within the directory structure. On the way up, you will use the "ls" command to list the contents of these directories.
| cd | ||
|---|---|---|
| Step | Activity | Anticipated Result |
| 1 | From the UNIX prompt, type "cd .." and press <ENTER>. | The working directory changes to the next higher directory. |
| ls | ||
|---|---|---|
| Step | Activity | Anticipated Result |
| 1 | From the UNIX prompt, type "ls" and press <ENTER>. | The directories and files in the directory are displayed. |
| ls | ||
|---|---|---|
| 2 | From the UNIX prompt, type "cd" and press <ENTER>. | The working directory changes to your home directory. |
A "-" tells the system that options will follow. More than one option can be preceded by a single "-".
The "a" tells UNIX to display all the files. Unless the "a" is used, files preceded by a dot ( ) do not display.
The "l" tells UNIX to display the files in long format, giving permissions, number of links to other files or directories, owner, group, byte size, time modified, and file name.
| ls | ||
|---|---|---|
| 3 | From the UNIX prompt, type "ls -al" and press <ENTER>. | The directories and files are displayed in long format for the home directory. |
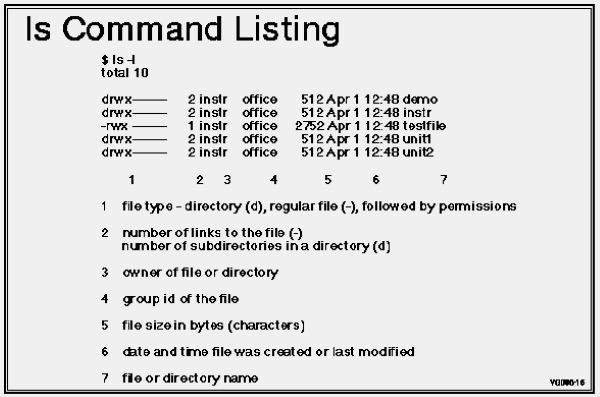 |
Permissions. The next nine characters consist of three sets of three characters each.
The next set refers to the primary group's permissions (r,w,x). Only one group at a time may be granted access to the directory/file.
The last set (r,w,x) refers to the others' permissions.
This concept is key to understanding permissions in the GCCS environment.
You may need to review files to check settings. You will use a file you built earlier in this lesson to demonstrate some of the UNIX file commands.
| more | ||
|---|---|---|
| Step | Activity | Anticipated Result |
| 1 | From the UNIX prompt, type "cd User_Storage". | Directory changes to User_Storage. |
| 2 | From the UNIX prompt, type "more 900xt_marines" and press <ENTER>. | The contents of the file are displayed. See note. | Note: This command can be used to view any ASCII file. Press CTRL-C at any time to break out of the more display. |
This command could be useful when trying to save a copy of a TPFDD to your home directory. The TPFDD could then be deleted from IMS, precluding access by other users.
Note: IMS stores TPFDDs in the /h/IMS_RFM/imsdata directory.
| cp | ||
|---|---|---|
| Step | Activity | Anticipated Result |
| 1 | From the UNIX prompt, type "cp 900xt_marines 900xt_USMC_bkup" and press <ENTER>. | A new, blank UNIX prompt displays. See note. |
| Note: Using the "cp" command, you can create a backup of the TPFDD, a reference file, etc. You could place this file into another directory, e.g., "cp 900xt_marines /h/data/local/tpfdd/900xt_marines". | ||
| mv | ||
|---|---|---|
| Step | Activity | Anticipated Result |
| 1 | From the UNIX prompt, type "ls -al" and press <ENTER>. | System responds with the filenames. See note. |
| Note: There is one file that needs to be renamed. It should appear in the list as 9090T.AF_nnnnnnnnn.AF, where the n's are a numerical sequence. | ||
| 2 | From the UNIX prompt, type "mv 9090t.af_nnnnnnnnn.af 9090t.af and press <ENTER>. | New UNIX prompt displays. |
| 3 | From the UNIX prompt, type "ls -al" and press <ENTER>. | System responds with the filenames. |
"find". The "find" command is used to find a file somewhere in a directory hierarchy.
There are numerous search parameters you can use with the "find" command. You will use three of them to search for your new 900xt_USMC_bkup file.
| find | ||
|---|---|---|
| Step | Activity | Anticipated Result |
| 1 | From the UNIX prompt, type "find . -name 900xt_usmc_bkup -print" and press <ENTER>. | System responds with the path and filename. See note. |
| Note: Display of ./.900xt_USMC_bkup means the file was found in the current directory, i.e., (.). To search the entire disk, replace the "." after find with a "/", e.g., "find / -name 900xt_USMC_bkup -print". | ||
To search into all the directories you have permissions for, replace the "." with "/". This starts the search in the root directory.
It is also very useful when protecting files in your home directory. If you change the permissions of copied TPFDDs and planning files to owner access only, other users cannot view, copy, or change them.
Note: Read permissions do not include search activities. Execute permissions for directories include search activities within the directory.
| chmod | ||
|---|---|---|
| Step | Activity | Anticipated Result |
| 1 | From the UNIX prompt, type "chmod 777 900xt_USMC_bkup" and press <ENTER>. | A new, blank UNIX prompt displays. See note. |
| Note: This makes 900xt_USMC_bkup accessible to everyone. | ||
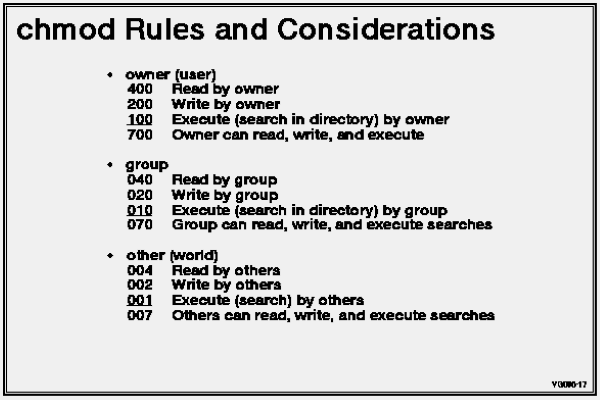 |
A sum of 500 would indicate the owner has read and execute permissions.
The group and other permissions are granted using the same methodology for the 'tens' and 'units' columns.
"rm". You can now remove the 900xt_USMC_bkup file from your directory with the "rm" (remove) command.
The "-i" option causes the system to ask for confirmation.
| rm | ||
|---|---|---|
| Step | Activity | Anticipated Result |
| 1 | From the UNIX prompt, type "rm -i 900xt_USMC_bkup" and press <ENTER>. | System prompts rm: remove 900xt_USMC_bkup? |
| 2 | Type "y" and press <ENTER>. | New UNIX prompt displays. |
Note: To completely remove a users' directory and all subsequent data and directories beneath, you can use the "-r" option of the remove command. However, once a file is removed in UNIX it cannot be restored. When it is gone, IT IS GONE!
"df". The "df" command displays the amount of free space on the disk. Each disk block is equal to 512 bytes.
The "df" command can also be used to see if a system is failing because the drives are filled to capacity. A full or highly fragmented disk can slow system response considerably.
| df | ||
|---|---|---|
| Step | Activity | Anticipated Result |
| 1 | From the UNIX prompt, type "df" and press <ENTER>. | The current amount of free disk space is displayed for each disk partition. See note. |
| Note: Hard disks can be, and usually are, split into sections called partitions. Each partition can contain a separate directory structure or file system. A disk can have up to eight partitions. Remote partitions from another machine can appear as a local partition. | ||
Note: UNIX commands and their options can be different between different hardware vendors. For example, the "df" command on the Sun server supports a "-k" option to show all disk space, in kbytes, used and unused. On the WWS, the "-k" option is not supported.
You cannot use "telnet" to access a different JOPES location and use the JOPES applications there.
Note: To run JOPES applications remotely you would use the RREM application which is taught later in this lesson.
| telnet | ||
|---|---|---|
| Step | Activity | Anticipated Result |
| 1 | From the UNIX prompt, type "telnet" and press <ENTER>. | "telnet" prompt displays. |
| 2 | Type "?" and press <ENTER>. | List of "telnet" commands display. |
| 3 | Type "open jtosvr" and press <ENTER>. | Trying and connected prompts display. See note. |
| 4 | Type your login and password. | Last login displays followed by a UNIX prompt. |
| Note: If "jtosvr" is not in the server's hostname file, the IP address for the JTO server is: "143.175.204.4." You can use the IP Address in lieu of "jto". | ||
| rup | ||
|---|---|---|
| Step | Activity | Anticipated Result |
| 1 | From the UNIX prompt, type "rup" and press <ENTER>. | Displays hostname, time since last boot, and load averages for machines connected to the local net- work. See note. |
| Note: The local network refers to those machines operating from the same hub, i.e., router or bridge. | ||
| finger | ||
|---|---|---|
| Step | Activity | Anticipated Result |
| 1 | From the UNIX prompt, type "finger" and press <ENTER>. | Displays additional information on users logged onto the system. See note. |
| Note: If telneted to a client, "finger" will only show info on the users logged onto that client. | ||
Note: You can perform many of the same functions as rup and finger if the Monitors icon, found on the launch window, is available to you.
| EXIT X-TERM WINDOW | ||
|---|---|---|
| Step | Activity | Anticipated Result |
| 1 | From the server UNIX prompt, type "exit" and press <ENTER>. | System exits the server and returns to your workstation. |
| 2 | From the UNIX prompt, type "exit" and press <ENTER>. | The XTerm window closes. |
OBJECTIVE. Given a GCCS environment, know how to establish and use the capability for a user to access a remote host and run an application.
Allow selected off-site users access to your local only plan.
Allow a network FM access to a local plan on a local server so that the network FM can distribute the plan network wide.
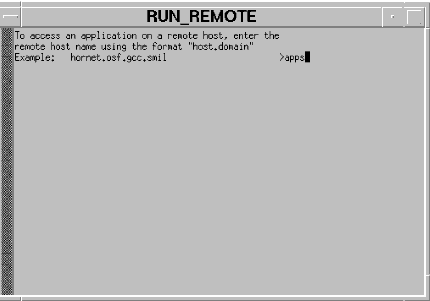
RREM Capabilities. To use the RREM capability, follow the keystrokes in the Run Remote table below. Keep in mind that to be allowed access to the remote sites applications, you must supply RREM with a valid remote host name. You must also use a valid login (userid) name for that remote host.
| RUN REMOTE | ||
|---|---|---|
| Step | Activity | Anticipated Result |
| 1 | From the LAUNCH WINDOW, <POINT AND DOUBLE CLICK (left)> on the RREM icon. | RUN_REMOTE window (Fig. 4-40) displays. |
 |
| RUN REMOTE | ||
|---|---|---|
| 2 | Type {the server name} and press <ENTER>. | The Enter remote username if different from login name prompt displays. |
| 3 | At the Enter Remote username prompt, press <ENTER>. | Your current userid is accepted and program list (Fig. 4-41) displays. |
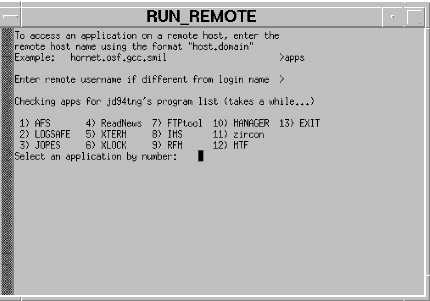 |
To return to the Run_Remote window, you will have to close the JNAV window. To close the JNAV window, you <POINT AND DOUBLE CLICK (left)> on the JNAV window Menu Button [-].
| RUN REMOTE | ||
|---|---|---|
| 4 | From the RUN_REMOTE window, type the number associated with the word EXIT, press <ENTER>. | The Run_Remote window disappears and you return to the Launch window. |
Requirement. Using the disk supplied by the instructor, upload the data (a file in TPFDD format) into your personal user storage area using the Session Manager Foldering system. Rename the file so that it does not have the numbers on it that the foldering system automatically puts there.
| PRACTICAL EXERCISE | ||
|---|---|---|
| Step | Problem | Solution |
| 4.3 | Upload the floppy disk file to your user storage area. | |
| 4.4 | Rename the file to remove the numbers added by the foldering system. | |
You also monitored the TDS and checked on whether or not the JOPES database was synchronized. You even did a little investigation on how well the TP and TDS were functioning.
Then you explored journalization and auditing to discover the who, what, where, and when concerning record changes to the JOPES database. With JOPES, this means you created history files and then used the auditing capabilities to view the history files.
Next you used the tools available for moving data, such as OPLANs, throughout the GCCS. These file transfer tools included parts of the System Services application, FTPtool, IMS, RFM, and the session manager Folder.
This lesson concluded with a review of the UNIX environment where you used several UNIX commands that might be helpful to you as you troubleshoot a problem.
![[Link to menu]](figs/menu.gif)
![[Link to previous section]](figs/previous.gif)