 |
Publication Date: 16 February 1996
System Version: GCCS 2.1/Update 5
Web Page Created:
Setup. To accomplish this lesson, you need GCCS connectivity and access to the GCCS Session Manager and JOPES applications from the JNAV window.
Now that you have a road map of what you will be doing for the next hour, the lesson continues by laying some basic groundwork for understanding some of the security and permissions issues associated with JOPES in the GCCS environment.
OBJECTIVE. Without the use of references, identify three possible breaches of GCCS or JOPES security.
Currently, none of the operating systems implemented in the initial GCCS installation, except for the 486 PC Tigersafe add-on security subsystem, have been evaluated by the National Computer Security Center (NCSC) and assigned a rating. Until GCCS is accredited to operate in a specific security mode, it is recommended that special care be taken with data and files that need special protection. You should assume that all users have access to all information in the system.
Note: The NCSC is planning security certification tests during the time that the user assessment of the JOPES applications is occurring.
Application Access Control. Access to the various GCCS applications is controlled at two levels. The first level of control is exercised by assigning various application icons to the Launch Window of each specific USERID. The second level of control is exercised by granting each specific USERID access to the myriad of directories and files that make up each specific application.
Terminal Security Packages. A security package requiring user identification and password access to many of the different types of workstations being used is generally automatically provided by the operating system and initial software load. That is, when the machine is turned on or booted, the first screen provided will require a USERID and password for the operator to continue. Currently, the most obvious exception to that is the DOS-based workstations that generally start at the DOS prompt when booting. This is especially true if the DOS workstation is being used only to run the JOPES application JFAST. Protection for those workstations can be provided by the use of an additional security package. Using the security package, the workstation can be configured to require a USERID and password for access. The COTS package usually used for security is called "Tigersafe."
Personal Security.
Note: The system software will accept and work with 6, 7, or 8 character passwords.
The maximum number of password entry attempts is three successive tries.
Note: The system currently allows you to try until you get it right.
Note: Currently, this is an individual users responsibility. The software does not require it to happen.
Data (File) Access Controls. Almost everything in GCCS (all of the programs, data, etc.) is stored in various files. Access to each of those programs, databases, etc., is controlled by the relationship between your USERID and the DAC mechanism used by UNIX.
Database Access Control. Access to the various databases in GCCS (JOPES, GSORTS, EVAC, etc.) is separately controlled by the combination of your USERID and the DAC mechanism used by UNIX.
Physical Security. The hardware in the GCCS environment also has controls imposed on it. Fiber-optic cables are treated differently than nonfiber-optic cable connections. Servers and workstations may be placed in secure alarmed areas. Computer screens should not be visible through outside windows and not visible to uncleared personnel within an office or building.
Product/Output Security. System output can be assigned to three general categories: output to the screen, output to hardcopy (printer), and output to a file (on the system or to a floppy disk or tape).
Files. File output can be to the server or workstation hard drive. File attributes on the hard drives do not have any provisions for classification markings. Information downloaded to floppy disks or to tapes will require the appropriate markings.
Now that you have had a quick review of some of the security requirements and permission schemes being used, you will turn your attention to logging in to the system.
OBJECTIVE. Given a GCCS environment, login to the server and access a specified GCCS application (JOPES).
Remote Login. Remotely located (non-LAN) users will have a few additional steps to accomplish the login sequence.
Character User Interface (CUI). If the communications link (9600 baud or lower) cannot efficiently handle graphic applications or you have a non-mouse capable workstation, you may not be able to access the full capability of the graphical user interface (GUI) available to the more powerful machines. You may have to use the CUI. Functional capability will be impacted because several applications have only a graphics capability. In addition, navigation will be different. The GUI uses a mouse for navigation while CUI is strictly forms mode and keyboard driven.
The login you use for this lesson should be close to the standard procedure for all the UNIX based workstations (SPARC, WWS, and HP).
Note: If logging into a UNIX based computer, all typed entries dealing with UNIX features (directories, files, login, etc.) are case sensitive (upper/lower case letters).
Note: The { } symbol in a keystroke table denotes a user defined variable entry.
| LOGIN TO JOPES | ||
|---|---|---|
| Step | Activity | Anticipated Result |
| 1 | Click the mouse to remove the screen saver and type your Login {userid} and press <ENTER>. | USERID posts and the cursor moves to Password field. |
| 2 | Type your {password} and press <ENTER>. | The DoD Consent to Monitoring screen displays. |
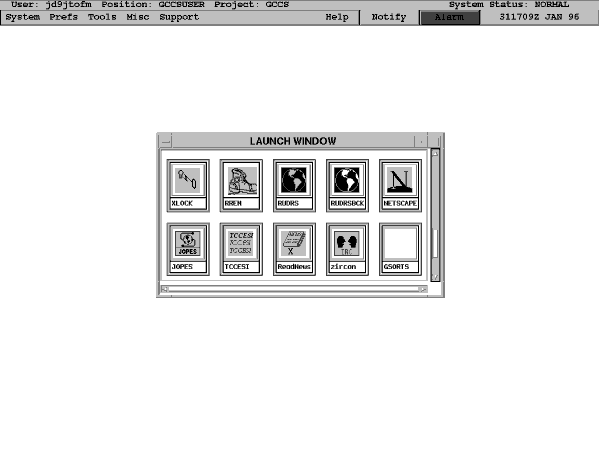
| 3 | Ensure the mouse cursor is on the screen and press <ENTER>. | A warning pop-up may display followed by the LAUNCH WINDOW posted to the center of the Session Manager screen (Fig. 2-1). |
 |
Note: The application icons shown in Figure 2-1 are unique for each specific USERID. Your Launch Window may have more or less icons available.
Note: The Session Manager menus may be different for each specific type of workstation.
Some applications use the <F1> function key for Help.
Some applications have context-sensitive Help where you <POINT AND CLICK (left)> on text or an area of the screen.
Some applications have Help menu options like the screen in Figure 2-1. The different styles will be pointed out or demonstrated as they occur.
| HELP | ||
|---|---|---|
| Step | Activity | Anticipated Result |
| 1 | <POINT AND CLICK (left)> on Help in the Session Manager Menu Bar. | Help pull-down menu displays. |
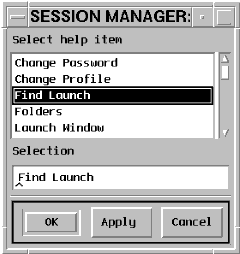
| 2 | <POINT AND CLICK (left)> on Index. | SESSION MANAGER: Help Selections window (Fig. 2-2) displays with a scrollable list of topics. |
 |
If you select Apply, the Help item pick-list remains open and the Help information you requested displays.
This convention applies to all Session Manager menus that have the OK and Apply options. OK terminates the function when finished, and Apply keeps the function active.
The scroll bar on the right side allows you to view additional information.
If you <POINT AND CLICK (left)> above or below the button within the scroll bar, the display moves one page at a time.
If you drag the button to a new location, the display moves to that relative position.
| HELP | ||
|---|---|---|
| 3 | <POINT AND CLICK (left)> on the Find Launch option. | Cursor line moves to Find Launch. |
| 4 | <POINT AND CLICK (left)> on Apply.
Read the Help dialogue that describes how to retrieve the LAUNCH WINDOW. See note. |
SESSION MANAGER: Index Help window displays. |
| Note: To access the Find Launch window activity, start with the Session Manager "System" menu selection vice the "File" menu selection noted in the Help window. | ||
| 5 | In the Index Help window, <POINT AND CLICK (left)> on OK. | SESSION MANAGER: Help Selections window (Fig. 2-2) redisplays with a scrollable list of topics. |
| 6 | From the SESSION MANAGER: Help Selections window, <POINT AND CLICK (left)> on Cancel. | SESSION MANAGER: Help Selections window (Fig. 2-2) closes. |
Documentation. DISA is also providing boxes of documentation as the loading of GCCS software progresses. That documentation includes load and maintenance instructions for the System Administrators, guidance for the Database Administrators, and user's manuals for everyone who is interested. In addition to these hard copies, many of the JOPES User Manuals and User Guides are also available on-line through the JNAV window.
JOPES Training Organization. The staff at the JOPES Training Organization also are ready to provide assistance whenever possible. They have a wealth of experience upon which to draw as well as being involved with the software currently being used in the client/server environment.
Global System Problem Report. There may be occasions when Help cannot resolve software deficiencies or something does not provide the functional results expected. When that happens, you should complete a Global System Problem Report, DISA Form 291, and forward it in accordance with site procedures. See Appendix F to this document for a copy of the form and its completion instructions.
GCCS Session Manager Launch Window. The Launch Window now displayed in the middle of the Session Manager screen allows you to select specific GCCS applications. The applications available to you are based on the user account established for your USERID. To launch an application, you can <POINT AND CLICK (left)> on the icon and <ENTER> or you can <POINT AND DOUBLE CLICK (left)> on the icon. The first icon you will launch is JOPES.
| ACCESSING JOPES APPLICATIONS | ||
|---|---|---|
| Step | Activity | Anticipated Result |
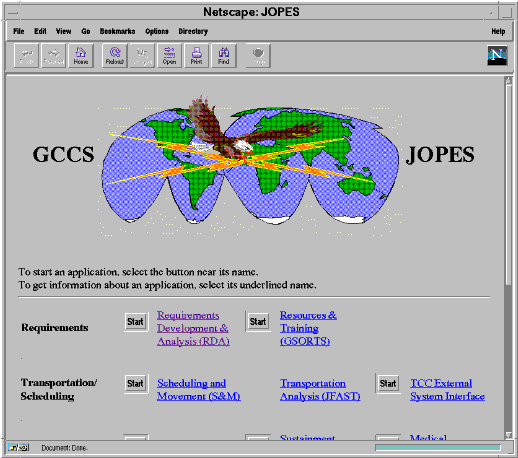
| 1 | If necessary, scroll to the JOPES icon, then <POINT AND DOUBLE CLICK (left)> on the JOPES icon. | The JOPES Navigation (JNAV) window (Fig. 2-3) displays. |
 |
| ACCESSING JOPES APPLICATIONS | ||
|---|---|---|
| 2 | <POINT AND CLICK (left)> on the words System Services in the Resource Services section. | Help information for the System Services application displays. Read the help. |
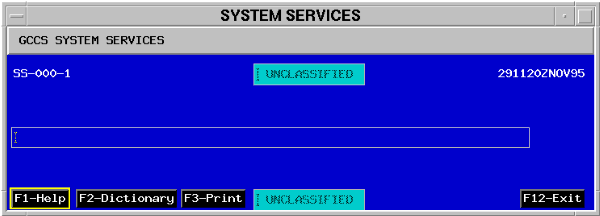
| 3 | <POINT AND CLICK (left)> on the System Services Start button. | The System Services application is launched and (Fig. 2-4) displays in the foreground. |
 |
You currently have three windows open. They are the Launch Window, the SS Help window, and the System Services window. The more windows you have open, the slower the system becomes. You should manage the number of open windows because processes on the windows in the background use memory and continue to run. If you iconify a window, it consumes less memory.
Window Management. The windows themselves have buttons and objects you can use to help manage the screen display.
Requirement. Find the Launch Window and move it to the lower right corner of the Session Manager screen. Move and resize the SS Help window; iconify it; and iconify the JNAV window.
| ACCESSING JOPES APPLICATIONS | ||
|---|---|---|
| 4 | <POINT AND CLICK (left)> on the System option in the Session Manager menu bar. | Pull-down menu displays. |
| 5 | <POINT AND CLICK (left)> on Find Launch. | LAUNCH WINDOW (Fig. 2-1) redisplays in the foreground. |
| 6 | <POINT, CLICK, DRAG, AND RELEASE (left)> the header line of the LAUNCH WINDOW to the lower right corner of the Session Manager screen. | LAUNCH WINDOW moves to new position. |
Note: Some workstations may provide you a menu when you <POINT AND HOLD (right)> on the header or border lines. If that occurs, select the "lower" menu option.
| ACCESSING JOPES APPLICATIONS | ||
|---|---|---|
| 7 | To reposition the LAUNCH WINDOW to the background, <POINT AND CLICK (right)> on the LAUNCH WINDOW's header or border. | LAUNCH WINDOW moves to background. |
| 8 | To reposition the SS Help window to the foreground, <POINT AND CLICK (left)> on its Header or window border. | SS Help window moves to the foreground. |